Classical Bridge Saddle and Nut Replacement

Today I completed a bridge and nut replacement on a classical guitar. The saddle in particular needed some work to become thin enough to match the slot on the bridge, but she was there after a little sanding and coaxing.

With a fresh set of strings, a polish and tune up she’s ready to go!


IMG_6957.JPG

IMG_6958.JPG

post

Les Paul Classic Overhaul

Today I worked on a beautiful Gibson Les Paul Classic that needed a bit of attention. There wasn’t anything massively wrong with the instrument, but it just needed some elbow grease in a few areas.

Much of the hardware was heavily tarnished and lacked the lustre of a new instrument. Similarly, the fret wire was dull and starting to corrode in a couple of places, and there was also a little rust on a few of the pickup pole pieces.

To remedy this I used some metal polish along with my Dremel multi tool, and the hardware came up a treat!

The frets were fairly tidy in terms of wear, so I just needed to bring them up to a vibrant shine as above, and they now look great!

To finish I fitted new strings, adjusted the intonation and the pickup heights for an even response.

The fair amount of weight to the guitar, and 60’s neck carve really suited the instrument, and it sounded wonderful through my Marshall during testing.

IMG_6741.JPGBefore and after…
IMG_6742.JPG
IMG_6743.JPG
IMG_6744.JPG

post

Gibson Les Paul Nut Slots

A recent guitar I did some work on was a lovely Gibson Les Paul that needed a little attention to the nut slots. The nut had been replaced elsewhere and the new slots were sitting a bit high, meaning fretting at the lower frets was slightly harder work than in other areas of the guitar. Tuning stability would be challenged as well, had they remained.

So, I was able to maintain the action of the guitar as well as cut the slots a fraction deeper to remedy the aforementioned problems. This can be a tricky job to do as you don’t really want to make any errors! Cutting too deep won’t do, so I was checking each time I used my file to take a little more out. Also, it was necessary to pay attention to the angle behind the nut which, if too shallow, would possibly make the string ‘fizz’, giving an undesirable sound and compromising sustain and overall enjoyment of the instrument.

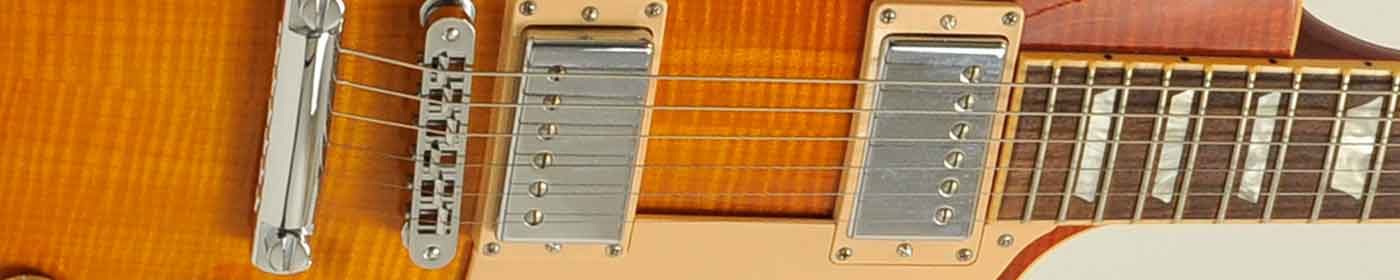
This particular guitar was really special. It has been played a great deal and bears the marks you’d expect – worn finish under the forearm, just under the bridge pickup, and a healthy dose of buckle rash. But what this guitar lacks in ‘mintness’ it makes up for in swathes with charisma and character. It resonated beautifully, and was so easy to play, it was fantastic. A real pleasure to work on it.

So it seems so far so good with the nut slots and depth, and the client seems happy with the adjusted intonation, too.

Since this one, a couple of similar jobs have come in, and it’s exciting to see the variety of instruments that are around! I look forward to updating you all soon!

IMG_6653.JPG
IMG_6654.JPG

post

Replacing Reverb Tanks and Finishing the SG

Today has been another interesting day in the workshop! So far I’ve replaced a couple of reverb tanks in a couple of amps, and I’ve been able to finish the SG off.

I got the replacement tanks from Hot Rox Uk, and the service was quick and efficient. They’re competitive on pricing so it was a good experience dealing with them.

The tanks are direct replacements for a Fender Blues Junior and a Mesa Boogie Lonestar Special, although the later tank is made by TAD rather than Belton/Accutronics, which is the brand you’re most likely to find in many Marshall, Mesa and Fender Amps and many more besides.

There are notable differences in the construction of both tanks – the Belton appears to be more expensive to manufacture, so we’ll have to see if it translates to a better tone/experience with the customer.

IMG_6518.JPG
IMG_6516.JPG

The SG client opted to get a new set of Gibson Classic ’57 and Classic + ’57 pickups with shiny chrome covers. These differ only slightly from the previous pickups, but sound great now that they’re in the guitar. They sound bright to my ears, in comparison with ’57s in a Les Paul I’ve got, but still lovely and versatile and definitely better than the stock pickups these guitars come with. It’s been a real treat to work on this guitar, and I look forward to the next one!

IMG_6519.JPG

IMG_6521.JPG

post

Gibson SG Pickup Removal

A customer has brought me their trusty Gibson SG standard to remove the pickups in readiness for some replacements that they’re sourcing.

The pickups to come out of the guitar are Gibson’s own Classic ’57’s, and these ones in particular were originally in a Custom Shop Historic Les Paul, hence the ageing on them.

These are beautiful-sounding pickups, rich in warmth and pristine clarity. They sound fabulous. I can’t wait to see what goes in in their place! Stay tuned! IMG_6448.JPG

IMG_6449.JPG

IMG_6443.JPG

post

Ibanez GMC Wiring Troubleshoot

Today I had to diagnose and correct a problem with a guitar with a circuit with a push-pull tone pot. The middle pickup only worked when the tone pot was in the raised position, and was silent when down, so this needed some investigation.

Due to the fact everything was working in theory, the solution should be relatively simple, and required only to make sure everything was attached, primarily all connections to do with the middle pickup itself. Within moments of opening the cavity it was obvious the problem was that one of the middle pickup wires had become detached, and simply needed reconnecting. Seconds later, the guitar was in full flow once more, on every setting.

The switching is quite interesting on this guitar – it operates in a similar fashion to most HHH guitars, only all of the coils are split when the tone pot is lifted, and this provides a rich set of tonal options from powerful rock to delicate and brittle single coil tones. Check out the wiring diagram below!


IMG_6404.PNG

Squier Refret

This Squier guitar is getting the refret treatment because the owner desires a different feel to the guitar – the previous fret wire was so shallow it made it very difficult to bend and play expressively, so we’re replacing the existing profile with a taller one.  Here’s the guitar so far – more tomorrow!


Strat Fret Stone and Set-up

Today I spent some time fret stoning and setting up a Fender USA Deluxe Strat.  The fret wear was fairly consistent along the neck, although the upper frets/dusty end weren’t too worn, so needed a touch more attention to bring them into line with the rest of the neck.  It was plain sailing though, and sure enough this baby is ready to sing and get going again!

Player’s Tele

This was a set-up that had three saddles in a vintage configuration.  The action was able to come down significantly and the relief in the neck was already sufficient for a decent feel, so no need to touch the truss rod on this occasion.  Getting the intonation balanced was certainly time-consuming, but the end result was lovely!


Player's Tele